
Project One: Point, Line, Plane and Balance
Objective:
To demonstrate the basic capabilities of Adobe Illustrator CC you will explore the software and the basic design elements of Point, line, and Plane along with the principle of Balance within in framework of Photographs and illustrator designs. You will also experiment with: Frame Reference, Touching, Overlapping, Cropping and Expansion. Your final design must have at least one image that illustrates Symmetric Balance, one image that illustrates Asymmetric Balance and one image illustrates Radial Balance.
Directions:
Step 1: Go out into the environment and take anywhere from 50 to 100 photos that demonstrate your understanding of Point, Line, Plane and Balance - in color with your digital camera. Then In your class shares folder, create the Folder system you see below.
Step 2: In Illustrator, create a new document File > New > Number of Artboards > 15 > Spacing 1 inch > Columns 5 > Width 4 in Height 4 in > Units Inches > Orientation > Vertical > Bleed 0 all across > in Advanced Area > Color Mode CMYK > Raster Effects PPI 300 > Preview Mode Default.
Step 3: Go to the Artboard Tool (towards bottom of the Tools Panel above the Slice Tool) > Going to the top left hand corner of your Artboards area click and drag a box roughly over all your Artboards > With your Artboards Tool still selected go to the label in the center square and select it. Make sure right below your Menu Bar it says X = 12 Y =7.
Step 4: With the Artboards Tool still selected go to the title of the large Artboard and select the title > in the area right below the Menu Bar change the X = 12 in and Y = 7 in > then change Width to 28 in and Height to 18. Your multiple Artboards should be centered and ready for greatness.
Step 5: In your first Layer take the Rectangle Tool and create a gray box with a fill of C=0 M=0 Y=0 K=40 over the entire Artboard area extending past the edge of the Artboard on all four sides. Save your AI file as YourLastNameART145Project1.ai to your class shares Project 1 Folder.
Step 6: Now lets open PS CC and open a few of your photos (which have all been placed in the Original Images folder in your Class Shares Folder) Go to Image > Mode > Grayscale to convert the image to a true “black and white photo” When the dialogue box comes up go ahead and discard color info. Now select your Crop Tool for the Tools panel and in the area right below the Menu Bar change the crop ratio (height, width, resolution) to 4 in x 4 in go ahead and change the location and size of your crop area by dragging a corner of the selection box now over your photo. Once you have an area you like go ahead and hit return. Image cropped! Repeat for each of your best images.
Step 7: Save all cropped and corrected images in their respective Folders (Point, Line, Plane) within your Photos Folder as .tif then return to your AI document and create a new layer titled Line > Go to File > Place and then find your first photo of line and place it within that layer. I recommend going to View > Snap >Place your images within the respective Rows/Artboards.
Step 8: In the final empty Artboards select your Rectangle Tool and create a perfect white square (on new layers) for each of the Artboards. Copy your favorite image from each area place it on top of your white square > Adjust Transparency to 40% > To the best of your ability recreate your photo using any AI tools you like.
Step 9: Save your File. Then Save again as a PDF > Make sure to have the page range set to page 16 in the dialogue box and save!
Materials:
Digital Camera
Adobe Illustrator CC
Adobe Photoshop CC
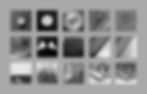


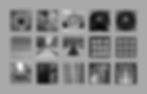

View student examples by selecting an image above