
Project Four: Low-polygonal Self-portrait
Objective:
Utilizing half of a 10” x 14” color photo at a PPI of 300 CMYK PSD File. You will create a well-crafted Symmetric Low-polygonal Self-portrait. You will create this utilizing a specific recorded Action Set, Polygonal Lasso Tool and at least 300 Layers that once duplicated will be roughly 600 Layers. Layer management is of the up most importance.
Directions:
Step 1: Make a Folder in your Class Shares titled: Project 5 > folder named Original Image > folder named Corrected Image
Step 2: Open your original photo from the Original Photo Folder in PS CC. Crop the image to 10” x 14” CMYK ,PPI, 300 > make any alterations to color and contrast. Save in your Corrected Image Folder as yourlastnamecorrectedimage.psd. Now resave your corrected and cropped PSD as yourlastnameproject5.psd in your Project 5 Folder. Make sure your Rulers are visible and drag a Guide from the left hand Ruler to the very center of your Image. You will only work on either the left or right side of your portrait, making around 300 polygons or more. Then we will group your Layers and then copy and mirror them to complete a symmetrically balanced image.
Step 3: Make sure your Layers are visible and go to Window > Actions to view your Actions Panel. Create a new Actions Set by selecting the folder button on the bottom of Actions Panel and name it “Make Poly” then create a new Action by selecting the New Action button right next to the trash at the bottom of the Actions Panel and name it “Average”. Make sure to change the Function key to F1 and deselect the Shift and Command options, color none > hit Record.
Step 4: Go ahead and select the square Stop Button on the bottom of the Actions Panel to stop Recording.
Step 5: Create a new blank Layer and in that Layer make a triangular selection in the left or right side of your image with your Polygonal Section Tool. Now while still in the new Layer go ahead and press Record (the red circle button) on the bottom of the Actions Panel. Everything you do will now be recorded.
Step 6: Now while recording select the background Layer and select the Command and J key to make a new Layer. Name this Layer “Poly”.
Step 7: Move your curser over the thumbnail image in the Poly Layer and press the Command key and then select the thumbnail with your mouse. This will select your triangular selection. Then go up to Filters > Blur > Average.
Step 8: Once your polygon is Average Blurred press Command D to deselect and then stop Recording by hitting the square stop button on the bottom of the Actions Panel.
Step 9: Lets go up to your System Preferences (by selecting the apple in the top left hand corner) then select the keyboard icon. Then select “Use all F1, F2 keys”. Return to your PSD and now make anther triangular selection with the Polygonal Lasso Tool and press the F1 key. You should see your selection average blurred and created in a new layer.
Step 10: Now you are ready to create your Polygonal Portrait by following the contours of the face within the context of multiple planes. I would recommend turning on a grid and enabling “Snap to Grid” to make sure your triangles are lining up right next to each other.
Step 11: You don't want any gaps between any of the triangles, this will be a major Craft issue if you do. If all else fails Free Transform you triangles to line up with each other. I would consider having all of your face, neck and ear polygons in one Group once you've completed them and your hair in another. Why? Well, very often our hair in parted or not quite symmetric so you may want to only mirror the face, neck and ear Group to complete the face and then do the hair separately, it’s just an option though. To create a Group of Layers select all the layers you want in your Group and then go to Layers > Group Layers or Command G.
Step 12: You can do this by going up to Photoshop > Preferences > Guides, Grids and Slices > Apply a grid color that will work for your image, change the Style to Dashed Lines > Gridline Every 30 Pixels subdivisions 1 (or whatever gridlines work for you). Then go to View > Snap to > Grid.
Step 13: Remember that if you select the Command key while in the Arrow Tool you can select any shape/layer that you are directly over. Also, Do not forget to change the Keyboard F Key Settings back to normal once you are done!
Step 14: Once your face, neck and ear layers are grouped into one Group copy that group by dragging it down to the New Layers Button then go to Select > Select All > Edit > Transform > Flip Horizontal. Make sure they line up well. Create some kind of background that compliments the image, shut of the background layer, check for gaps and save. Also save a flattened version as well as flattenedyourlastnameproject5.psd we will print and mount that one.
Materials:
Wacom Tablet, Adobe Photoshop CC, Jpeg Image


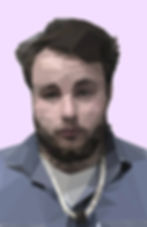


View student examples by selecting an image above